
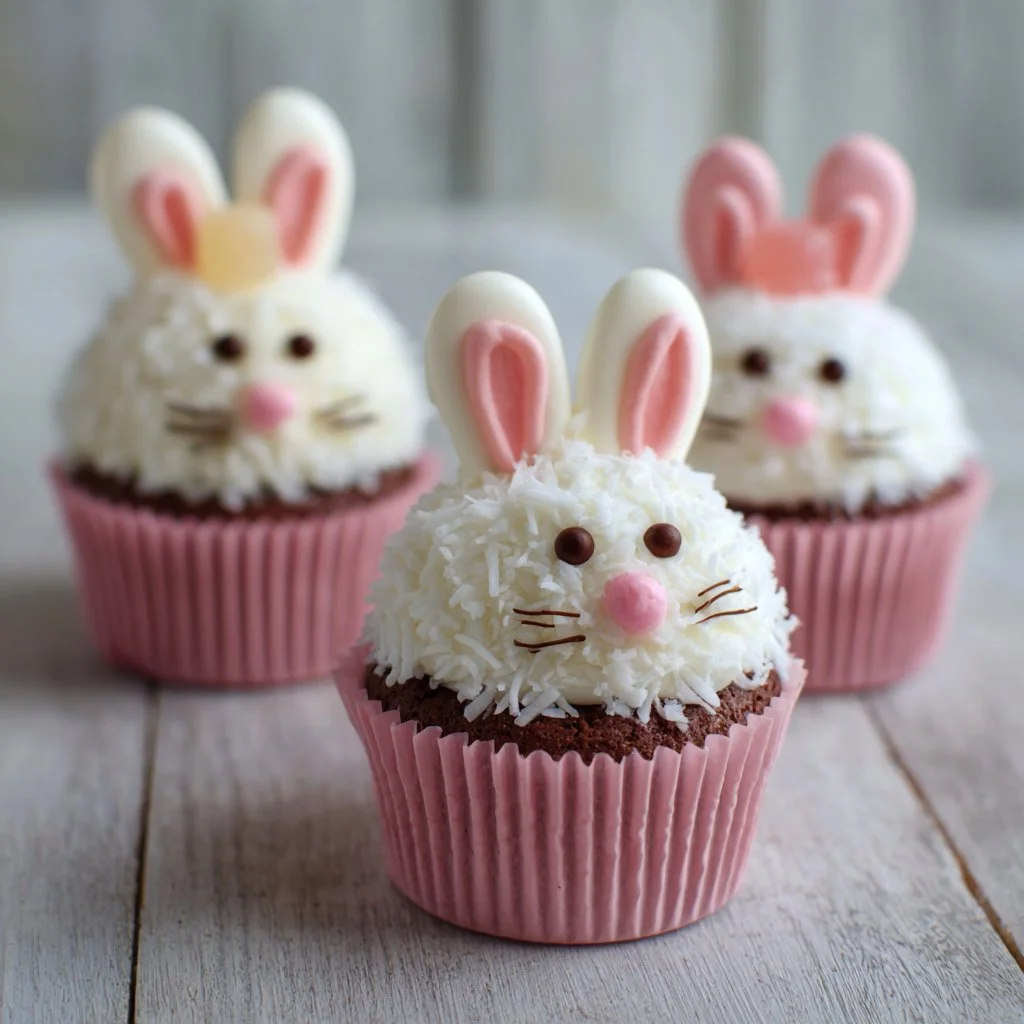
Start here to make a sweet, whimsical treat that’s fast, kid-friendly, and perfect for spring celebrations. These Bunny Cupcakes turn a simple boxed chocolate cake into a playful dessert with minimal fuss.
They’re easy enough for a baking afternoon with kids and impressive enough for a party table. You’ll get tender chocolate cake, pillowy white frosting, and fluffy coconut that looks like bunny fur.
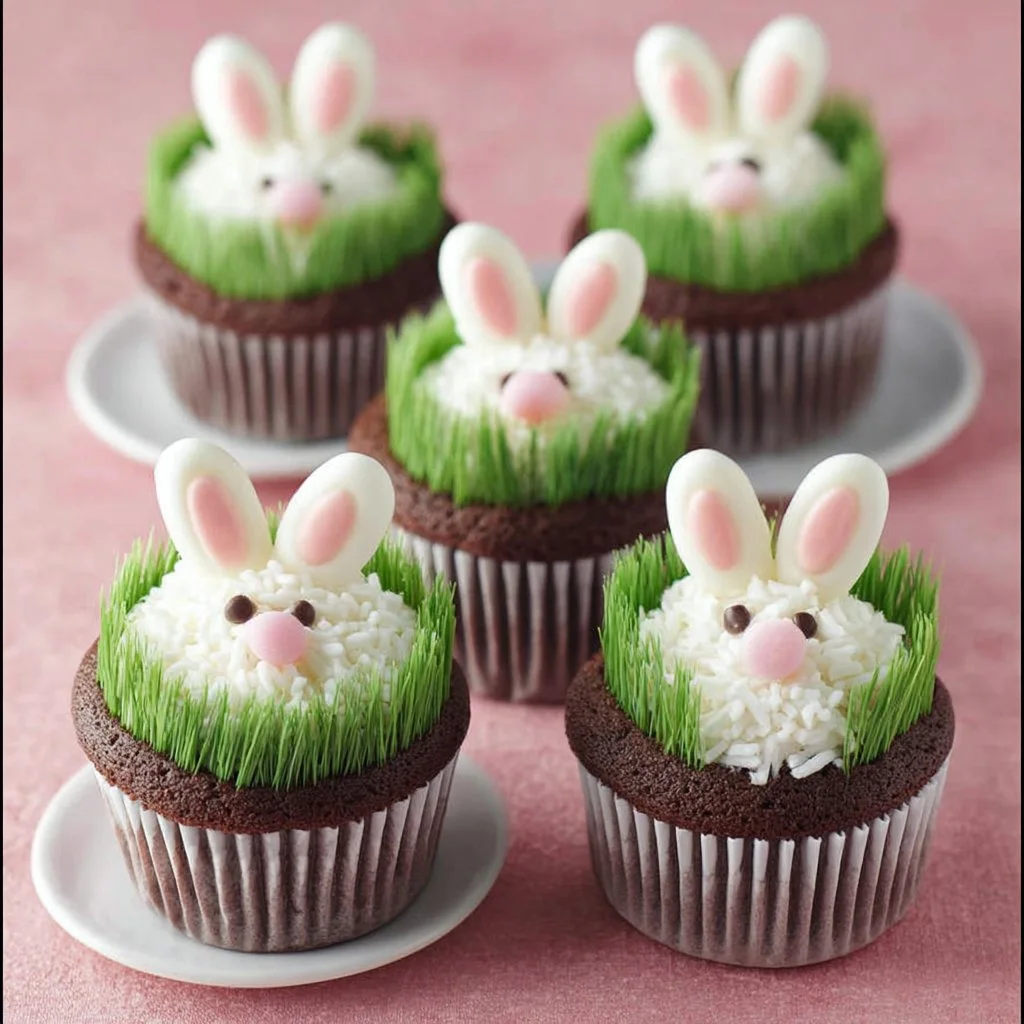
Try a themed lineup with other holiday cupcakes for variety and color. For inspiration on decorating styles that pair well, see my take on chocolate carrot patch cupcakes.
Why You’ll Love This Bunny Cupcakes
– Quick and approachable for bakers of any skill level.
– Uses pantry-friendly ingredients and one boxed mix.
– Adorable, edible decorations kids can help place.
– Great for Easter baskets, classroom treats, or a spring dessert table.
– Texture contrast between moist cake and fluffy coconut frosting.
– Highly customizable with simple swaps for dietary needs.
These Bunny Cupcakes taste like rich, moist chocolate cake under a sweet, creamy layer of white frosting. The grated coconut adds a light chew and visual fluff that mimics fur, while chocolate chip eyes and a pink nose give personality and charm.
"Absolutely adorable and delicious — my kids helped make them and they disappeared in minutes! Perfect for Easter and so simple." — 5-star reader review
Key Ingredients for Bunny Cupcakes
Choose a few ingredients carefully for the best texture and appearance of Bunny Cupcakes.
Eggs
Eggs provide structure, lift, and moisture. Use large eggs at room temperature for even emulsification; cold eggs can make batter seize and produce uneven rise. If you substitute with egg replacer, expect slightly denser cupcakes and adjust baking time.
Chocolate cake mix
The boxed chocolate cake mix is the backbone for flavor and convenience. Pick a brand you enjoy eating straight from the box because its cocoa intensity and sugar level will define the final taste. Swapping for a homemade chocolate batter will work, but you’ll need to account for different moisture and sweetness levels.
White frosting (canned)
A smooth, stable white frosting gives the clean canvas needed for the coconut fur to stick and for decorations to stay put. Choose a firm, pipeable frosting for neater results; thinner icings won’t hold the coconut as well. Substituting with cream cheese frosting will add tang and may soften the coconut’s adherence, so chill briefly before decorating.
Coconut flakes
Coconut creates the bunny fur texture and visual appeal. Shredded or flaked coconut both work; sweetened coconut adds extra sweetness and chew, while unsweetened keeps sugar in check. If you omit coconut, use white sprinkles or finely grated white chocolate for a similar fluffy look.
Full Ingredient List for Bunny Cupcakes
– 1 box of chocolate cake mix
– 3 eggs
– 1/2 cup vegetable oil
– 1 cup water
– 1 can of white frosting
– Coconut flakes (for the bunny fur)
– Mini chocolate chips (for the eyes)
– Pink candy melts or marshmallows (for the nose)
– Gummy candies (for the ears)
Step-by-Step Instructions for Bunny Cupcakes
Step 1: Preheat the oven and prepare the pan
Preheat your oven to 350°F (175°C) and line a cupcake pan with cupcake liners. Use liners that are sturdy so they hold shape when filled.
Pro Tip: The oven should smell neutral and feel warm immediately after reaching 350°F; liners should sit flat and ready.
Step 2: Mix the batter
In a bowl, mix the chocolate cake mix, 3 eggs, 1/2 cup vegetable oil, and 1 cup water until well combined. Use a whisk or electric mixer on low for about 30–45 seconds until smooth and slightly glossy.
Pro Tip: Batter should pour easily but not be runny; it will feel thick and ribbon slightly when lifted from the spoon.
Step 3: Fill the cupcake liners
Fill the cupcake liners about 2/3 full with batter to allow room for rise without overflowing. A standard ice cream scoop or 1/4-cup measure helps keep portions even.
Pro Tip: Each liner should show batter reaching about two-thirds of the liner height; tops will dome slightly during bake.
Step 4: Bake until done
Bake in the preheated oven for about 20 minutes or until a toothpick comes out clean. Rotate the pan halfway through the bake for even browning.
Pro Tip: Tops should be springy to the touch and edges will pull slightly away from the liners.
Step 5: Cool completely
Let the cupcakes cool completely on a rack before decorating. Warm cupcakes will melt frosting and cause coconut to slide off.
Pro Tip: Cupcakes should feel room temperature and not warm to the touch; a cool interior ensures stable frosting.
Step 6: Frost each cupcake
Once cooled, frost each cupcake with white frosting. Spread to create a small mound that the coconut can cling to, or pipe a fluffy dome for a fuller fur effect.
Pro Tip: Frosting should be smooth and opaque; you should not see cake peeking through.
Step 7: Create the bunny fur
Sprinkle coconut flakes on top for the bunny fur. Press gently so the coconut adheres evenly over the entire frosted surface.
Pro Tip: Fur should look fluffy and full, like a small snowy mound; avoid bare patches.
Step 8: Add eyes and nose
Use mini chocolate chips for the eyes and place a pink candy melt or a small marshmallow for the nose centered below the eyes. Space eyes evenly for a cute expression.
Pro Tip: Eyes should sit level and about one-third down from the top of the dome; the nose should be slightly below and centered.
Step 9: Attach the ears
Use gummy candies to create the ears by inserting the base lightly into the frosting at the top of the cupcake. Angle them for personality — upright, flopped, or slightly tilted.
Pro Tip: Ears should stand stably with about half their base embedded in frosting; they will bend if the frosting is too soft.
Step 10: Serve and enjoy
Enjoy your adorable Bunny Cupcakes! Arrange them on a platter and keep them cooled until serving. They’re best eaten within a day for peak texture.
Pro Tip: Cupcakes should look cohesive as a group with consistent fur and facial placements.
Expert Tips for Bunny Cupcakes
– Temperature tip: Bring eggs to room temperature before mixing to ensure even rise and lighter crumb.
– Bake evenness: Use an oven thermometer and rotate the pan halfway to avoid hot-spot domes or uneven browning.
– Texture troubleshooting: If cupcakes are dry, reduce bake time by 2–3 minutes and check with a toothpick; overmixing will also dry them out.
– Frosting firmness: Chill frosted cupcakes for 10 minutes before adding coconut to help the flakes stick without sinking.
– Equipment tip: Use a small offset spatula or a butter knife to smooth frosting domes quickly and evenly.
– Decoration speed: Layout all decorations in sections before starting so assembly is fast and consistent.
– Common mistake: Pressing decorations too hard will compress the frosting and smear coconut; place gently.
– Visual guide: Match coconut distribution so each cupcake has similar fur coverage for a professional platter display.
Storage & Freezing for Bunny Cupcakes
Fridge storage: Store frosted Bunny Cupcakes in an airtight container in the refrigerator for up to 3 days. Use a single layer to protect decorations and keep at the middle shelf where temperatures are steady.
Freezer storage: Freeze unfrosted cupcakes in a single layer on a tray until solid, then transfer to a freezer-safe container or zip bag for up to 3 months. Wrap the container with plastic wrap to prevent freezer burn.
Thawing: Thaw frozen unfrosted cupcakes overnight in the refrigerator or at room temperature for 1–2 hours. Once thawed, frost and decorate as directed.
Reheating: For a warm cupcake, reheat unfrosted cupcakes in the microwave for 8–10 seconds; do not microwave frosted cupcakes. Use a low oven (300°F / 150°C) for 5–7 minutes if you prefer oven-warm.
Variations & Substitutions for Bunny Cupcakes
Chocolate lover variation: Substitute a fudgy chocolate frosting for the white frosting and use white shredded coconut dyed lightly with edible white gel to keep the fur effect. The result is richer and more chocolate-forward while keeping the bunny look.
Allergy-friendly variation: Use dairy-free canned frosting and unsweetened coconut, and swap gummy ears for fruit leather to avoid gelatin. Expect slightly different textures but similar visual charm.
Mini bunny version: Make mini cupcakes by filling mini liners halfway and baking for 10–12 minutes. The result is bite-sized party favors with quicker bake and a compact, cuter appearance.
Spring fruit twist: Add a teaspoon of raspberry jam under the frosting for a fruity surprise and swap pink candy nose for a small freeze-dried raspberry. This creates a tangy counterpoint to the chocolate base.
Frequently Asked Questions About Bunny Cupcakes
Q1: How long do Bunny Cupcakes stay fresh after decorating?
A1: When decorated with canned frosting and coconut, store cupcakes in an airtight container at room temperature for up to 24 hours. For longer storage, refrigerate for up to 3 days to preserve freshness while keeping decorations intact.
Q2: Can I make Bunny Cupcakes ahead of time for a party?
A2: Yes. Bake cupcakes up to 48 hours in advance and refrigerate unfrosted in an airtight container. Frost and decorate on the day of the event for the freshest appearance. Frozen unfrosted cupcakes can be stored up to 3 months and decorated after thawing.
Q3: How do I prevent coconut from turning soggy on the frosting?
A3: Use a stable, thick frosting and apply coconut shortly after frosting while still tacky. Chill for 10–15 minutes after applying coconut to set. Avoid excess humidity and serve within a day for best texture.
Q4: What can I use instead of gummy candies for ears if I don’t have them?
A4: Alternatives include sliced marshmallows cut into ear shapes, folded fruit leather, or small pieces of chocolate-covered pretzels. These substitutes change texture and look but keep the bunny silhouette.
Q5: Why did my cupcakes sink in the center and how do I fix it?
A5: Sinking can be caused by underbaking, overmixing, or opening the oven door too early. Use an oven thermometer to confirm temperature, mix just until combined, and test for doneness with a toothpick before removing. If sinking occurs, trim the center slightly and fill with extra frosting before decorating.

Final Thoughts on Bunny Cupcakes
Bunny Cupcakes are an easy, joyful way to turn everyday ingredients into a festive centerpiece. They’re fast to make, customizable, and perfect for involving kids in the kitchen.
Please leave a star rating in the recipe card below and pin this to Pinterest for your next spring celebration.
Conclusion – Bunny Cupcakes
For more step-by-step inspiration and alternative ear techniques, check out this charming tutorial on Easy Bunny Cupcakes – Your Cup of Cake.
If you want a different ear style and piping ideas, see the detailed guide at Easter Bunny Cupcakes – Preppy Kitchen.
For a family-friendly, full-featured version with lots of photos, I also recommend this version at Bunny Cupcakes – The Pioneer Woman.
Bunny Cupcakes
Ingredients
Method
- Preheat your oven to 350°F (175°C) and line a cupcake pan with cupcake liners.
- In a bowl, mix the chocolate cake mix, eggs, vegetable oil, and water until well combined.
- Fill the cupcake liners about 2/3 full with batter.
- Bake in the preheated oven for about 20 minutes or until a toothpick comes out clean.
- Let the cupcakes cool completely on a rack before decorating.
- Frost each cupcake with white frosting evenly.
- Sprinkle coconut flakes on top for the bunny fur, pressing gently.
- Use mini chocolate chips for the eyes and place a pink candy melt or marshmallow for the nose.
- Insert gummy candies lightly into the frosting as ears.
- Arrange the Bunny Cupcakes on a platter and keep them cooled until serving.