
Creamy, chocolatey, and perfectly portioned — these mini cheesecakes feel indulgent without the fuss of a full cake.
They’re ideal for weeknight dessert wins, parties, and when you need a rich finish to a simple meal.
Make them ahead for effortless entertaining or whip them up with kids for a fun baking project.
Short prep, simple ingredients, and big chocolate flavor make these tiny treats addictive.
They reward a little patience in cooling and chilling with a velvety texture and glossy ganache finish.
Why You’ll Love This Mini Chocolate Cheesecakes
– Portable, single-serve portions that bake evenly.
– Intense chocolate flavor with a crisp Oreo crust.
– Smooth, dense cheesecake texture that isn’t chalky.
– Quick assembly and fast bake time for a homemade treat.
– Make-ahead friendly for parties and holidays.
– Easy to customize with toppings or mix-ins.
– Great for sharing and stunning on a dessert tray.
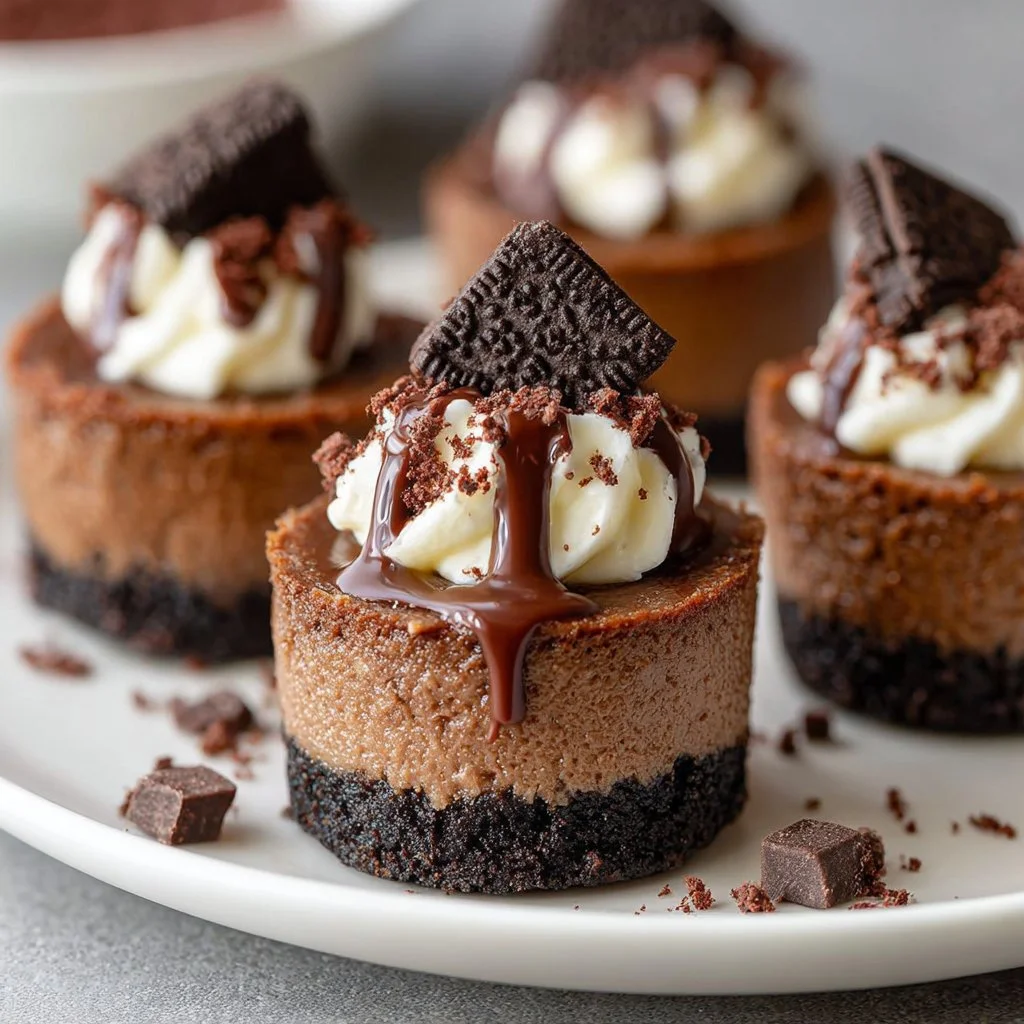
The flavor is deep cocoa balanced by tangy cream cheese and a crunchy Oreo base.
Texture is silky and dense but not heavy, with a shiny ganache that adds richness and a whipped cocoa topping that lightens each bite.
A contrast of crisp crust, tender filling, and pillowy whipped cream keeps every forkful interesting.
"These mini cheesecakes disappeared in an hour — incredible texture and perfect chocolate punch. 10/10!" — A satisfied reader
Key Ingredients for Mini Chocolate Cheesecakes
Cream cheese is the backbone. Use full-fat, block-style cream cheese at room temperature for smooth whipping and structure. Low-fat brands have more water and won’t set as firmly; if you substitute, expect a softer, less stable cheesecake.
Oreo cookie crumbs create the no-fuss crust. The high-fat cookie crumbs bind easily when mixed with melted butter and give a familiar chocolate crunch. You can swap for graham crackers for a milder base, but the flavor profile will be noticeably lighter.
Semi-sweet chocolate (melted) folded into the batter deepens chocolate intensity and helps set the filling. Choose good-quality baking chocolate or chopped bars for smooth melting. Using lower-quality chips may result in grainy pockets or less glossy filling.
Heavy whipping cream is critical for both ganache and topping. For ganache, hot cream melts chips into a glossy, pourable sauce that seals the cheesecake. For the topping, chilled heavy cream whips to firm peaks; milk or half-and-half will not aerate correctly and will collapse.
Full Ingredient List for Mini Chocolate Cheesecakes
– Oreo cookie crumbs – 1 cup (134g)
– Unsalted butter, melted – 2 tbsp
– Cream cheese, room temperature – 12 ounces (339g)
– Granulated sugar – 1/2 cup (104g)
– Natural unsweetened cocoa powder – 2 tbsp (14g)
– Sour cream, room temperature – 1/4 cup (58g)
– Vanilla extract – 1/2 tsp
– Large eggs, room temperature – 2
– Semi-sweet chocolate, melted – 4 oz
– Semi-sweet chocolate chips (for ganache) – 3 oz (85g)
– Heavy whipping cream (for ganache) – 1/4 cup (60ml)
– Heavy whipping cream (for topping) – 3/4 cup (180ml)
– Powdered sugar – 3 tbsp (22g)
– Natural cocoa powder (for topping) – 3 tbsp (14g)
– Vanilla extract (for topping) – 1/2 tsp
Step-by-Step Instructions for Mini Chocolate Cheesecakes
Step 1: Prepare oven, liners, and crust
Preheat the oven to 325°F (162°C) and line a cupcake pan with liners.
Combine the Oreo crumbs and melted butter, then press the mixture firmly into the bottom of each liner to form even crusts.
Bake the crusts for 5 minutes, then remove and let them cool. Lower the oven temperature to 300°F (148°C).
Pro Tip: The crust should look matte and set when pressed; it will smell pleasantly of chocolate and be slightly firmer to the touch.
Step 2: Beat cream cheese, sugar, and cocoa
In a large bowl, beat room-temperature cream cheese, granulated sugar, and unsweetened cocoa powder on low speed until smooth.
Stop to scrape the bowl so no lumps remain and keep speed low to avoid incorporating air.
Pro Tip: The batter should be glossy and free of streaks when ready; if it looks curdled, keep beating gently until smooth.
Step 3: Add sour cream and vanilla
Mix in the sour cream and vanilla extract until just combined.
This adds creaminess and a touch of tang that balances the chocolate.
Pro Tip: The mixture should feel slightly looser but still thick; it will spread slowly off a spoon.
Step 4: Add eggs one at a time
Add the eggs one at a time, beating slowly and scraping the bowl between additions to avoid air bubbles.
Overbeating traps air and leads to cracks in the cheesecake, so maintain a gentle approach.
Pro Tip: The batter should be uniform and satiny; if bubbles rise, tap the bowl gently on the counter to pop them.
Step 5: Fold in melted chocolate and fill liners
Gently stir in the 4 oz of melted semi-sweet chocolate until the batter is uniform and smooth.
Fill each cupcake liner nearly to the top with the cheesecake mixture, leaving a small gap for the topping and ganache.
Pro Tip: The batter should be thick but pourable; it will hold shape slightly and have a deep chocolate sheen.
Step 6: Bake, rest in oven, and cool
Bake the mini cheesecakes for 15 minutes. Turn off the oven and leave the door closed for 10 minutes to prevent sudden temperature shifts.
Crack the oven door slightly and let them cool for 20 minutes before transferring to the refrigerator to chill and set fully.
Pro Tip: Centers should be slightly wobbly but not liquid; after chilling they will firm up with a silky surface.
Step 7: Make ganache and spread
Make the ganache by heating the 1/4 cup heavy cream, pouring it over the 3 oz chocolate chips, and whisking until smooth.
Spread the warm ganache over the cooled cheesecakes so it seals the top with a shiny layer.
Pro Tip: Ganache should glide easily and set to a glossy finish; if too thick, warm briefly over a water bath until pourable.
Step 8: Whip topping and pipe
Whip the remaining 3/4 cup heavy cream with powdered sugar, cocoa, and vanilla to stiff peaks. Pipe or dollop the whipped cocoa topping onto each cheesecake for a professional finish.
Pro Tip: Stiff peaks should hold their shape and have a satiny sheen; if the cream looks curdled, it is overwhipped and can be rescued with a tablespoon of fresh cream and gentle folding.

Expert Tips for Mini Chocolate Cheesecakes
– Temperature tip: Always start with room-temperature cream cheese and eggs to prevent lumps and overmixing. Cold ingredients resist blending and encourage a grainy batter.
– Baking tip: Lowering the oven to 300°F after parbaking the crust prevents rapid rise and cracking in the filling. A gentler bake equals a smoother top.
– Texture troubleshooting: If your cheesecakes crack, they were likely overbeaten or baked at too high a temperature; reduce mixing speed and watch oven heat.
– Equipment tip: Use a stand mixer or a hand mixer with a paddle attachment for the smoothest batter; a whisk will incorporate too much air.
– Cooling tip: Gradual cooling in the oven then on the counter prevents shock and helps the filling set without fissures.
– Ganache tip: Warm the ganache slightly if it firms before spreading; it should be pourable but not hot enough to melt the whipped topping.
– Common mistake: Overfilling liners leads to spillover and uneven baking; fill close to the top but leave room for expansion.
– Presentation tip: Pipe whipped cocoa topping with a star tip for attractive swirls; chill briefly before serving to set the shape.
Storage & Freezing for Mini Chocolate Cheesecakes
Fridge storage: Store cheesecakes in an airtight container for up to 4 days.
Place parchment between layers to prevent sticking if stacking is necessary.
Freezer storage: Freeze unfrosted cheesecakes in a single layer on a baking sheet until firm, then transfer to a freezer-safe container or bag for up to 2 months.
Label with the date and use within 8 weeks for best texture.
Thawing: Thaw in the refrigerator overnight for best texture.
Avoid thawing at room temperature, which can produce condensation and soggy crusts.
Reheating: These are best served chilled. If you prefer slightly warmer, allow them to sit at room temperature for 15–20 minutes.
Do not microwave; the filling may become grainy or separate.
Variations & Substitutions for Mini Chocolate Cheesecakes
Salted caramel swirl: Add 1–2 tbsp of thick salted caramel to the top of each cheesecake before chilling, then ripple gently with a toothpick.
The caramel cuts through the richness and adds a sweet-salty contrast.
Peanut butter swirl: Fold 3 tbsp of natural peanut butter into the batter or swirl on top before baking.
The result is a nutty, slightly savory counterpoint that pairs beautifully with chocolate.
Mint chocolate: Replace the vanilla in the filling and topping with 1/4 tsp peppermint extract and garnish with crushed candy canes.
This yields a bright, refreshing note and a festive appearance.
Raspberry compote topping: Spoon a quick heated raspberry sauce over the ganache before piping the cream.
Fruit acidity brightens the dense chocolate and adds a glossy, jewel-toned finish.
Frequently Asked Questions About Mini Chocolate Cheesecakes
Q: How can I prevent my mini cheesecakes from cracking?
A: Prevent cracks by avoiding overmixing and by baking at a low temperature. Use room-temperature ingredients and beat just until combined. Cool them gradually: turn off the oven and leave them inside for 10 minutes, then crack the door before removing. Rapid temperature changes and trapped air are the main culprits for cracking.
Q: Can I make these gluten-free?
A: Yes. Swap the Oreo crumbs for a certified gluten-free chocolate cookie crumb or a gluten-free graham cracker crumb. Ensure all ingredients, including chocolate and toppings, are labeled gluten-free to avoid cross-contamination.
Q: How long do mini cheesecakes need to chill before serving?
A: For optimal texture, chill for at least 2 hours. Overnight chilling is best as it allows the filling to fully set and flavors to meld. If short on time, 1 hour will firm them somewhat but expect a slightly softer center.
Q: Can I bake these without a cupcake pan?
A: You can bake in individual silicone molds or mini tart pans, but baking times may vary slightly. Use similar volume molds and check for a slight jiggle at the center to determine doneness.
Q: Is it okay to use cocoa powder instead of melted chocolate in the batter?
A: The recipe includes both cocoa powder and melted chocolate. Cocoa adds dry chocolate flavor while melted chocolate provides fat and structure. Replacing melted chocolate entirely with more cocoa will thin the mouthfeel and reduce gloss and richness.
{image_template}
Final Thoughts on Mini Chocolate Cheesecakes
These Mini Chocolate Cheesecakes balance rich chocolate, a crisp Oreo base, and airy whipped cocoa for an elegant, easy dessert.
If you enjoyed the recipe, please leave a star rating in the recipe card below and pin this to Pinterest.
For inspiration and similar recipes, check this version with an Oreo crust from If You Give a Blonde a Kitchen.
For technique notes and another pro take, see the Baker by Nature mini chocolate cheesecakes guide at Baker by Nature.
For a playful, family-friendly variation and photos, visit the Hungry Happenings mini chocolate cheesecakes post at Hungry Happenings.
Mini Chocolate Cheesecakes
Ingredients
Method
- Preheat the oven to 325°F (162°C) and line a cupcake pan with liners.
- Combine the Oreo crumbs and melted butter, then press the mixture firmly into the bottom of each liner to form crusts.
- Bake the crusts for 5 minutes, then remove and let them cool. Lower the oven temperature to 300°F (148°C).
- In a large bowl, beat room-temperature cream cheese, granulated sugar, and unsweetened cocoa powder on low speed until smooth.
- Mix in the sour cream and vanilla extract until just combined.
- Add the eggs one at a time, beating slowly and scraping the bowl between additions.
- Gently stir in the melted semi-sweet chocolate until the batter is uniform and smooth.
- Fill each cupcake liner nearly to the top with the cheesecake mixture and bake for 15 minutes.
- Turn off the oven and leave the door closed for 10 minutes.
- Open the oven door slightly and let the cheesecakes cool for 20 minutes before transferring to the refrigerator.
- Make the ganache by heating the heavy cream, pouring it over the chocolate chips, and whisking until smooth.
- Spread the warm ganache over the cooled cheesecakes.
- Whip the remaining heavy cream with powdered sugar, cocoa, and vanilla to stiff peaks and pipe onto each cheesecake.