
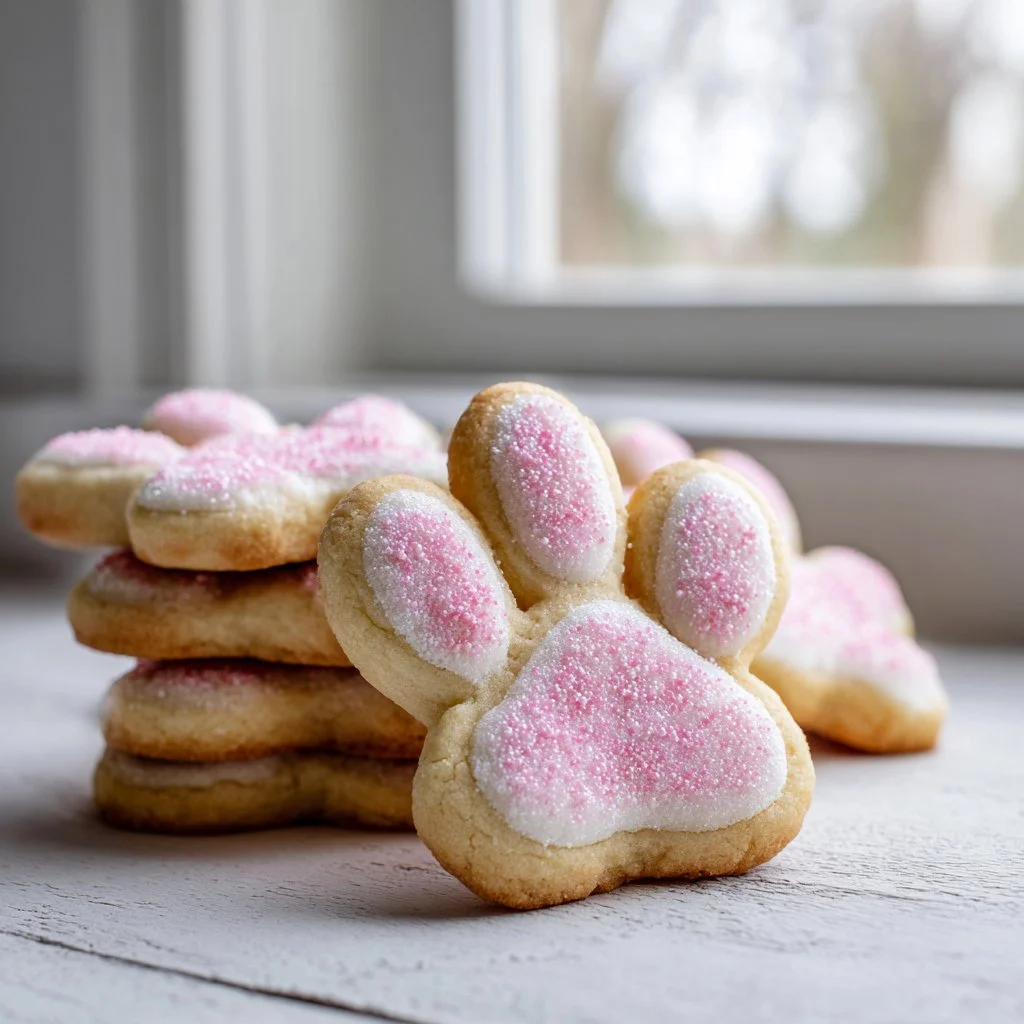
Start here with a tiny hook: these Bunny Paw Cookies are impossibly cute and simple to make.
Soft, buttery rounds get a fluffy royal-icing paw and chocolate toe beans for an adorable finish.
They’re perfect for spring treats, classroom parties, or an extra-sweet baking day.
Keep reading for ingredient science, step visuals, and pro tips to get picture-perfect paw prints every time.
Why You’ll Love This Bunny Paw Cookies: Easy Bake Tech
– Cute, Instagram-ready bunny paw design with minimal piping skill required.
– Tender, buttery cookie that stays soft — not rock-hard — even days later.
– Royal icing that dries firm for stacking and gifting.
– Simple pantry ingredients with one easy chocolate dot trick for toes.
– Kid-friendly decorating that’s a great activity for parties.
– Chilling step makes shaping foolproof for beginners.
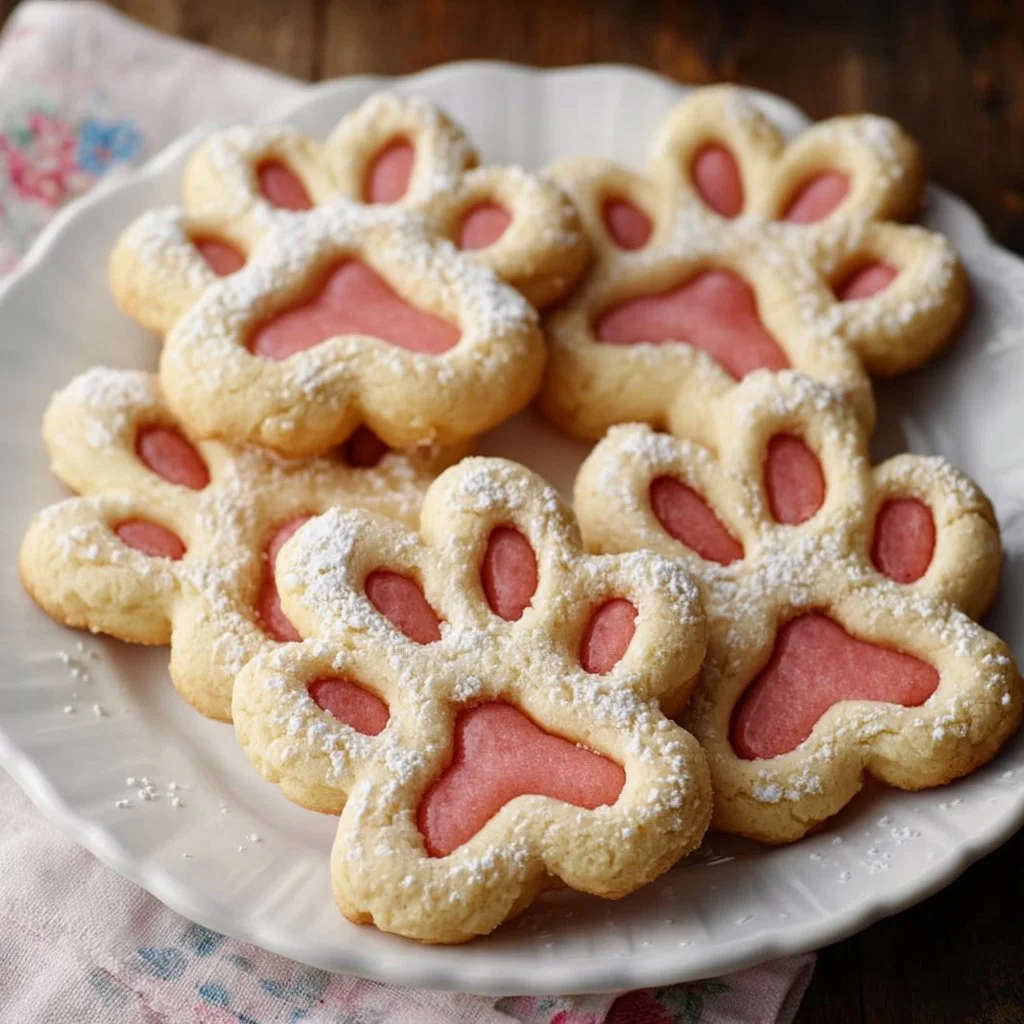
These cookies bite into a tender, almost shortbread-like base with a soft center and crisp edge. The white royal icing gives a matte, fluffy look while the pink pad and chocolate toe beans add texture contrast and a rich finish.
"These came out perfect for my Easter table — soft cookies, pretty icing, and even my six-year-old could help decorate. 5 stars!" — a happy reader
Try a no-bake finishing treat with the same fuss-free approach if you love low-effort dessert wins.
Key Ingredients for Bunny Paw Cookies: Easy Bake Tech
All cookies are simple chemistry; a few ingredients determine everything from spread to color and texture.
All-Purpose Flour
All-purpose flour gives structure without being tough. Use fresh flour (check the best-by date) for reliable rise and texture. If you substitute with cake flour the cookies will be more tender but may spread more; if you use bread flour they will be chewier due to higher gluten.
Unsalted Butter (softened)
Butter provides richness, flavor, and spread control. Buy high-quality unsalted butter and soften it to room temperature rather than microwaving to preserve emulsification. If you swap with margarine or a low-fat butter spread, expect flatter, less flavorful cookies and a different mouthfeel.
Powdered Sugar (for royal icing)
Powdered sugar makes the icing smooth and sets firm because of its cornstarch content. Sift it to avoid lumps and pick a finely milled variety for glossy royal icing. Replacing it with granulated sugar won’t work — the icing will be grainy and won’t dry properly.
Meringue Powder
Meringue powder stabilizes royal icing and helps it dry rock-hard. Use it instead of raw egg whites for food safety and consistency. If you omit the meringue powder and use raw whites, the icing may be softer and at higher food-safety risk, especially if cookies are stored at room temperature for days.
Full Ingredient List for Bunny Paw Cookies: Easy Bake Tech
– 2 1/2 cups All-Purpose Flour
– 1 cup (2 sticks) Unsalted Butter, softened
– 1 cup Granulated Sugar
– 2 Large Eggs
– 1 teaspoon Pure Vanilla Extract
– 1/2 teaspoon Baking Powder
– 1/4 teaspoon Salt
– 3 cups Powdered Sugar
– 3-4 tablespoons Milk
– 1/2 teaspoon Almond Extract
– 1 tablespoon Light Corn Syrup
– 2-3 drops Red Food Coloring
– 3 tablespoons Meringue Powder
– 6 tablespoons Warm Water
– 1/4 cup Dark Chocolate Chips
– 1/2 teaspoon Coconut Oil (optional)
Step-by-Step Instructions for Bunny Paw Cookies: Easy Bake Tech
Step 1: Cream butter and sugar, add eggs and vanilla
Begin by making sure the butter is perfectly softened — press it lightly and it should indent without feeling greasy. In a large bowl or stand mixer fitted with the paddle attachment, cream the butter and granulated sugar on medium speed until light, fluffy, and noticeably paler, about 3–5 minutes. Add the eggs one at a time, mixing after each addition, scrape down the bowl, then mix in the vanilla so it’s evenly distributed.
Pro Tip: The mixture should look pale and airy with visible tiny air pockets when you lift the paddle.
Step 2: Combine dry ingredients and form dough
Whisk together the all-purpose flour, baking powder, and salt in a separate bowl. Gradually add the dry mix to the creamed butter mixture on low speed until just combined; stop as soon as no streaks of flour remain. The dough should come together into a soft, pliable ball without being sticky.
Pro Tip: The dough should hold shape when pressed and not feel gummy; if it sticks, dust your hands with a bit of flour.
Step 3: Chill the dough
Divide the dough in half, flatten each portion into discs, wrap tightly in plastic wrap, and chill for at least 1 hour, or ideally overnight. This chilling step firms up the butter for cleaner-cut shapes and prevents excessive spreading during baking.
Pro Tip: Chilled dough will feel cold and firm but still sliceable; it should not be rock hard.
Step 4: Roll, cut, and bake
Preheat your oven to 375°F (190°C) and line baking sheets. On a lightly floured surface, roll one disc to about 1/4 inch thickness. Use a 2.5–3 inch round cutter to make cookie rounds and place them about an inch apart on the sheet. Re-roll scraps and repeat. Bake 8–10 minutes until edges are lightly golden and centers are just set.
Pro Tip: The cookie bottoms should be slightly golden while the tops look set but not browned.
Step 5: Cool completely before decorating
Let the cookies cool on the baking sheet for 5 minutes, then transfer to a wire rack. Ensure they are completely cool before decorating to avoid melted icing.
Pro Tip: Cool cookies will feel room temperature and firm to the touch; any warmth will soften icing.
Step 6: Make royal icing and adjust consistency
Combine powdered sugar and meringue powder in a bowl. Add warm water gradually (one tablespoon at a time) while mixing on low until you get a smooth, shiny icing. Aim for a consistency where a spoonful dropped back into the bowl disappears in 10–15 seconds. Divide about 1/4 cup of white icing into a separate small bowl and tint it light pink with 2–3 drops of red food coloring. Transfer white and pink icings into piping bags fitted with small round tips (or snip a corner).
Pro Tip: Proper icing should pipe smoothly and form a slight peak that settles quickly.
Step 7: Pipe white base and pink pad
Pipe a medium-sized white circle in the center of each cookie and flood it to fill. Let that layer set for 15–20 minutes until it forms a slight skin. Then pipe a pink oval in the upper center of the white circle for the main paw pad.
Pro Tip: The white layer should look matte and no longer glossy at the surface before adding pink.
Step 8: Add chocolate toe beans and dry
Melt dark chocolate chips with a tiny bit of coconut oil if using. Dot three small circles below the pink oval using a toothpick or very small piping bag to create toe beans while the pink is still a little tacky. Let cookies dry at room temperature for several hours or overnight until icing is firm.
Pro Tip: Chocolate dots should be glossy when applied and set to a firm, matte finish after drying.
Expert Tips for Bunny Paw Cookies: Easy Bake Tech
– Temperature tip: Always use room-temperature butter for proper creaming; too cold and it won’t trap air, too warm and cookies will spread.
– Texture troubleshooting: If cookies are crumbly, you likely overbaked; shave 1–2 minutes off the time next batch.
– Equipment tips: Use a paddle attachment or hand mixer for even creaming and a silicone mat for even baking.
– Icing consistency: Use the 10–15 second “spoon test” for flood icing; adjust with drops of water or a pinch of powdered sugar.
– Common mistake: Decorating warm cookies — always cool fully to avoid runny icing and bleeding colors.
– Chocolate dots: Add 1/8 teaspoon coconut oil to melted chocolate for a smoother pour and shinier finish.
– Re-rolling guidance: Roll scraps as few times as possible; overworking increases gluten and toughens cookies.
– Baking sheet rotation: Rotate sheets halfway through baking if your oven cooks unevenly.
Need another simple cake idea? This recipe uses a similar method for foolproof texture and timing.
Storage & Freezing for Bunny Paw Cookies: Easy Bake Tech
Fridge storage: Store undecorated cookies in an airtight container in the refrigerator for up to 5 days. Decorated cookies should be stored at room temperature in a single layer or separated with parchment to prevent smudging and will keep for 3–4 days.
Freezer storage: Freeze undecorated cookie dough discs wrapped tightly in plastic and a freezer bag for up to 3 months. You can also freeze baked, undecorated cookies in a single layer on a sheet, then transfer to a freezer bag once solid for up to 2 months.
Thawing and reheating: Thaw frozen dough overnight in the fridge before rolling and baking. Thaw baked cookies at room temperature for 30–60 minutes; avoid microwave reheating as it can soften the icing and change texture.
Best containers: Use rigid, airtight plastic or metal tins for decorated cookies and double-wrap dough in plastic plus a freezer bag to prevent freezer burn.
Pair these cookies with a chilled no-bake dessert for a balanced table of textures.
Variations & Substitutions for Bunny Paw Cookies: Easy Bake Tech
Chocolate shortbread variation: Replace 1/4 cup of flour with unsweetened cocoa powder and add 1–2 tablespoons milk if needed. The result will be a richer, chocolatey base that contrasts nicely with white icing.
Almond-scented paw cookies: Swap vanilla for 1/2 teaspoon almond extract in the cookie dough and omit almond in the icing. The cookies take on a fragrant, nutty note and pair well with dark chocolate toes.
Lighter lemon version: Add 1 tablespoon lemon zest and 1–2 teaspoons lemon juice to the dough, reducing milk slightly. Expect a bright, citrusy cookie that’s slightly crisper and very refreshing.
Nut-free royal icing: Use your standard powdered sugar and meringue powder mix but omit almond extract and ensure all decorations are nut-free. The icing will taste slightly less complex but remains firm and perfect for kids’ events.
Try a cookie-butter twist for a warm, spiced flavor that still works with the same icing techniques.
Frequently Asked Questions About Bunny Paw Cookies: Easy Bake Tech
Q1: How do I prevent my cookies from spreading too much?
A1: Chill the dough for at least 1 hour or overnight; ensure butter is not too soft; measure flour accurately by spooning and leveling. Bake on a cool baking sheet, not a hot one, and avoid over-creaming the butter and sugar.
Q2: Can I make the royal icing without meringue powder?
A2: You can use pasteurized liquid egg whites, but meringue powder is safer and more stable for storage. If using egg whites, consume within a day or refrigerate decorated cookies and avoid gifting for long periods.
Q3: My icing is too runny — how do I fix it?
A3: Add sifted powdered sugar a tablespoon at a time until the 10–15 second spoon test is met. Work slowly; overly thick icing can be thinned with tiny water drops, but it’s easier to thicken than thin.
Q4: How long do decorated cookies need to dry before stacking?
A4: Let them dry at least 8 hours, ideally overnight, on a flat surface at room temperature. For humid environments, allow 24 hours to ensure full hardening.
Q5: Can I replace dark chocolate chips with candy melts for the toe beans?
A5: Yes; candy melts create bright colors and set firmly without oil. However, they have a different flavor and can look more plastic-like; dark chocolate offers a richer taste and a sleeker finish.
Final Thoughts on Bunny Paw Cookies: Easy Bake Tech
These Bunny Paw Cookies are an easy, high-impact treat with soft cookies and a crisp royal-iced finish that’s perfect for gifting or parties. If you enjoyed this tutorial, please leave a star rating in the recipe card below and pin the recipe to Pinterest.
For inspiration and alternate takes on playful bunny treats, check out this Best Bunny Pawprint Cookies Recipe – Delish, browse kid-friendly bunny snacks like Organic Friends Bunny Grahams – Annie’s Homegrown, or enjoy a whimsical rabbit-themed blog post at Hello, my name is Bunny – Bunnycakes.
Bunny Paw Cookies
Ingredients
Method
- Cream butter and sugar in a large bowl until light and fluffy. Add eggs one at a time and mix in vanilla.
- Whisk together flour, baking powder, and salt in a separate bowl.
- Gradually add the dry ingredients to the creamed mixture until just combined. Form into a ball.
- Divide the dough in half, flatten into discs, wrap in plastic, and chill for at least 1 hour or overnight.
- Preheat oven to 375°F (190°C). Roll out the dough and cut with a round cutter. Bake for 8-10 minutes.
- Let cookies cool on a wire rack before decorating.
- Combine powdered sugar and meringue powder. Gradually add warm water until smooth. Divide and tint as needed.
- Pipe a white base on each cookie and let set. Add the pink pad and chocolate dots for toes.