
A creamy, dreamy homemade take on the classic candy — these Chocolate Creme Eggs are worth every minute in the kitchen.
They’re perfect for holiday trays, gifts, or a weekend project that feels fancy but stays simple.
Ready in under an hour, these little eggs balance silky milk chocolate with a marshmallow-like center that pops with a tiny citrus surprise.
If you like decadent, hand-made confections, this recipe will quickly become a new staple.
Why You’ll Love This Chocolate Creme Eggs
– Homemade candy that looks store-bought but is made in your kitchen.
– Silky milk chocolate shells with a pillowy, sweet filling.
– Quick to assemble and kid-friendly to help with piping.
– Customizable colors and flavors for holidays or parties.
– Great for gifting — they travel well when chilled.
– Economical: pantry ingredients, big yield (48 minis).
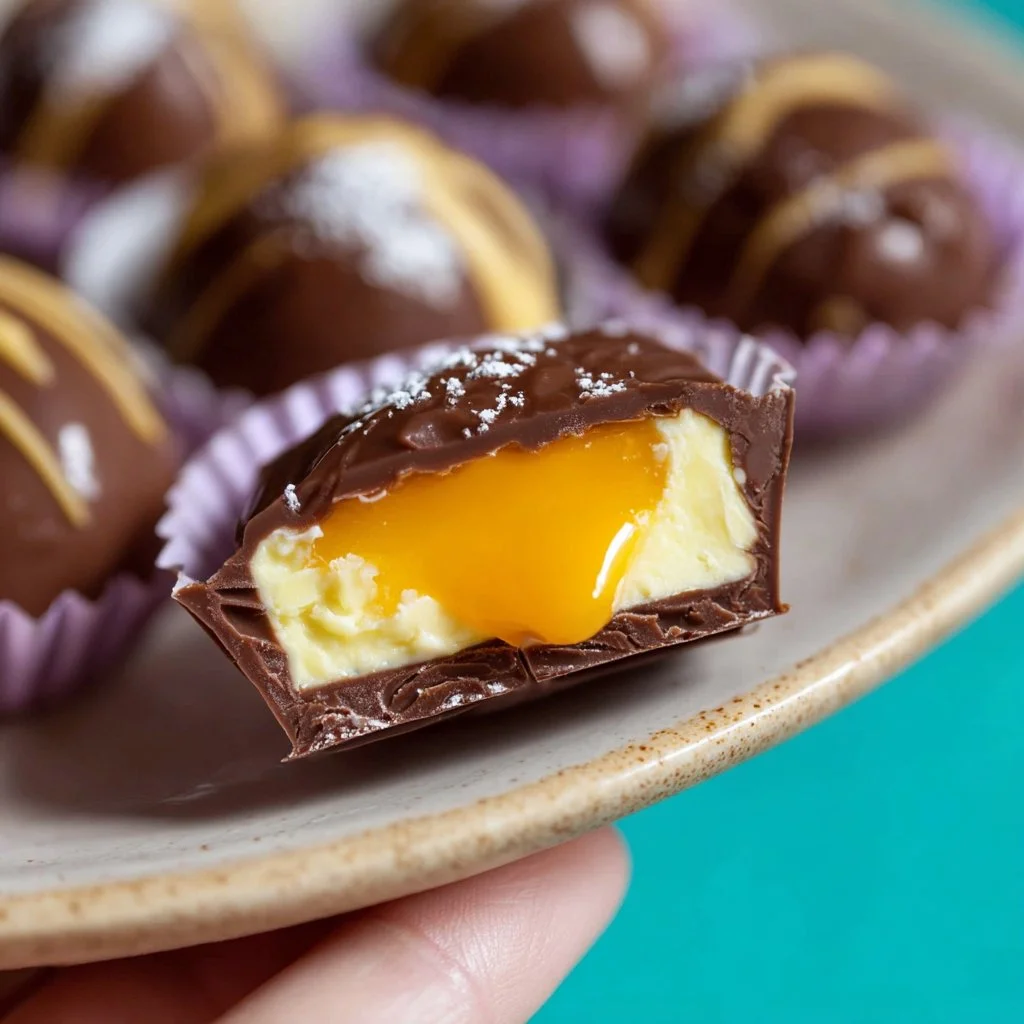
The first bite gives a glossy milk chocolate snap, followed by a cloudlike, sweet creme that melts on your tongue. Texturally it’s a contrast between a thin chocolate shell and a soft, smooth center with a tiny orange dot that lifts the sweetness. The result is nostalgic, rich, and perfectly balanced for a bite-sized treat.
"Absolutely stunning and addictive — the shells were glossy and the creme was like a softer Cadbury center. Made these for Easter and they vanished in a day!" — 5 stars, home baker
Key Ingredients for Chocolate Creme Eggs
Milk chocolate (2 pkgs, melted and divided): Use good-quality milk chocolate chips or bars for the smoothest melt and best flavor. Look for chocolate with cocoa butter as the first ingredient rather than vegetable oils; it melts glossy and sets with a nice snap. If you substitute with dark chocolate, the flavor will be more intense and less sweet; white chocolate will be sweeter and softer — both require tempering adjustments.
Light corn syrup (1 cup): Corn syrup keeps the filling silky and prevents crystallization in confectioners’ sugar mixtures, giving the creme its marshmallow-like texture. Buy a clear, light corn syrup for the cleanest flavor; avoid heavy or dark syrups that add molasses notes. If you swap for golden syrup or glucose, textures will be similar; using honey will add flavor and make the filling stickier.
Powdered sugar (6 cups): This is the structure of the creme. The fine texture dissolves quickly into the butter and corn syrup, creating a smooth, pipeable filling. Sift it if it’s clumpy and use pure confectioners’ sugar with cornstarch for consistency. Replacing with granulated sugar is not recommended — the grain will make the filling gritty.
Butter, softened (1/2 cup): Butter adds richness, mouthfeel, and a slight savory balance to the sweet filling. Use unsalted butter so you can control saltiness; bring it to room temperature for easy creaming. Substituting with margarine changes the flavor and may make the filling looser; stabilized shortening will firm up the filling but lacks the buttery flavor.
Full Ingredient List for Chocolate Creme Eggs
– 2 pkgs (16 oz each) milk chocolate, melted and divided
– 1 cup light corn syrup
– 1/2 cup butter, softened
– 2 tsp vanilla extract
– 6 cups powdered sugar
– 1/2 tsp salt
– 2 Tbsp milk
– 2 drops orange gel food coloring
– 1 drop yellow gel food coloring
Step-by-Step Instructions for Chocolate Creme Eggs
Step 1: Prepare the mini muffin pan
Line 48 mini muffin cups with small parchment paper liners so the chocolate eggs lift out easily after setting. Proper liners make unmolding clean and prevent the chocolate from sticking to metal or silicone.
Pro Tip: The liners should sit flat and reach the top edge — visually the cup looks fully lined and smooth.
Step 2: Melt half the chocolate
Put 16 ounces of milk chocolate in a microwave-safe bowl and microwave on HIGH for 30 seconds, then stir. Continue in 20-second bursts, stirring between each, until the chocolate is completely melted and glossy. Avoid overheating which can seize the chocolate.
Pro Tip: Melted chocolate should be shiny with no grainy bits; it should flow smoothly when tilted.
Step 3: Pipe the chocolate shells
Transfer the warm chocolate to a piping bag, snip the tip, and pipe a thin layer into the bottom of each lined mini cup. Tap the pan gently on the counter so the chocolate spreads evenly and eliminate air pockets. Work quickly before the chocolate cools to maintain a smooth shell.
Pro Tip: Each cup should show a thin, even chocolate base with no holes — the surface looks mirror-like.
Step 4: Make the creme filling
In a stand mixer, beat the softened butter and corn syrup until creamy. Add milk, vanilla, and salt, then slowly incorporate the powdered sugar until the mixture holds stiff peaks and is pipeable. The filling should be stiff enough to mound but still soft to the touch.
Pro Tip: The filling will look bright white and slightly glossy; when you lift the beater, the peak should gently hold its shape.
Step 5: Divide and color the filling
Spoon two-thirds of the filling into a piping bag for the white center. Color the remaining one-third with two drops orange gel and one drop yellow gel to achieve a small orange dot color; place that into a separate small piping bag. Gel colors are concentrated — add one drop at a time.
Pro Tip: The orange filling should be a small, vivid dot color, not diluted — it looks like a candy yolk.
Step 6: Fill the cups with white creme
Pipe a thick layer of the white filling into each chocolate-lined cup, forming a dome that sits above the chocolate rim. This is the bulk of the center and must be substantial to mimic the classic creme egg texture.
Pro Tip: Each cup should show a white mound that fills the cup to nearly the top, with a smooth, satiny surface.
Step 7: Add the orange dot
Pipe a small dot of the orange-colored filling directly into the center of each white dome. Gently tap the pan so the dot settles but does not spread to the edges. This gives the cream its signature citrus-y center.
Pro Tip: The orange dot should remain centered and small — visually it should be a single, round orange spot within the white dome.
Step 8: Seal with remaining chocolate
Melt the remaining 16 ounces of milk chocolate as before and pipe it over each filled cup, sealing chocolate to the edges so the creme is fully enclosed. Smooth the tops if needed and ensure the edges are sealed to prevent filling leakage.
Pro Tip: The final chocolate should form a glossy cap that meets the liners’ edge; when cooled, the top is smooth and has a faint sheen.
Step 9: Chill until set
Refrigerate the pan for 30 minutes until the chocolate is firm and the centers are set. Once firm, remove the parchment liners and transfer the eggs to an airtight container.
Pro Tip: The set chocolate should snap lightly and the filling should remain soft and creamy, not liquid.

Expert Tips for Chocolate Creme Eggs
– Temperature tips: Keep chocolate between 86–90°F when working for best gloss. If it cools, warm it gently in short bursts.
– Texture troubleshooting: If the filling is too loose, add more powdered sugar a tablespoon at a time; if too stiff, add a splash of milk.
– Equipment tips: Use a small round piping tip or snip a tiny hole for control; a disposable piping bag minimizes cleanup.
– Chocolate handling: If chocolate seizes, stir in a teaspoon of vegetable oil to smooth it, but note flavor changes.
– Coloring tips: Gel food coloring won’t thin the filling like liquid colorings, so you keep the right consistency.
– Common mistakes: Overheating chocolate causes graininess; under-beating filling yields a dense center.
– Visual cues: Work under bright light so you can spot streaks or air bubbles in the chocolate shell and correct them.
– Yield optimization: Use a scale for even portions; 48 minis should each contain about 1 tablespoon of total filling and chocolate.
Storage & Freezing for Chocolate Creme Eggs
For short-term storage, place the eggs in an airtight container and refrigerate. They keep best chilled and will stay fresh for up to 10 days in the fridge.
If you need longer storage, freeze them in a single layer on a baking sheet until solid, then transfer to a freezer-safe container with parchment between layers; they will keep up to 3 months.
To thaw, move frozen eggs to the refrigerator for 4–6 hours or overnight, then bring to room temperature for 15–20 minutes before serving so the chocolate regains its shine.
Avoid reheating; if the chocolate loses gloss, gentle brushing of melted tempered chocolate can restore appearance, but avoid direct heat on the filling.
Variations & Substitutions for Chocolate Creme Eggs
Dark Chocolate Chocolate Creme Eggs: Replace milk chocolate with high-quality dark chocolate for richer, less sweet shells. The contrast with the sweet filling becomes more pronounced and adult-friendly. Tempering may be required for a firm snap.
White Chocolate Citrus Creme Eggs: Use white chocolate for shells and add a teaspoon of lemon or orange zest to the filling. The result is a sweeter, brighter candy with a sunny flavor profile that’s visually striking.
Vegan Chocolate Creme Eggs: Swap dairy butter for vegan butter and use dairy-free milk chocolate; substitute corn syrup with golden syrup if preferred. You’ll get a dairy-free treat with a slightly different mouthfeel but similar structure — see a tested vegan approach for guidance.
Mini Caramel-Filled Eggs: Mix a few tablespoons of soft caramel into the center before sealing with chocolate for a gooey surprise. The caramel adds chew and deeper flavor, but chill a bit longer to prevent leakage.
Frequently Asked Questions About Chocolate Creme Eggs
Q: Can I temper the chocolate for a better snap?
A: Yes. Tempering stabilizes cocoa butter crystals for a glossy finish and firm snap. If you prefer fully tempered chocolate, bring the chocolate to 115°F, cool to 80°F, then gently reheat to 88–90°F for milk chocolate before piping. Tempering is especially helpful if you live in a warm climate.
Q: Why did my chocolate look dull after setting?
A: Dull chocolate usually means it wasn’t tempered or was exposed to moisture or fluctuating temperatures while cooling. To improve shine next time, work in a dry, cool environment and avoid rapid temperature changes; you can also rub a tiny amount of tempered chocolate over the surface to add gloss.
Q: My filling is grainy — how can I fix it?
A: Graininess often comes from under-mixed powdered sugar or using low-quality sugar. Rebeat the filling on low speed and add a teaspoon of corn syrup or milk to help dissolve any tiny sugar crystals; if needed, pass the mixture through a fine mesh sieve.
Q: Can I make these without a stand mixer?
A: Yes. Use a sturdy hand mixer or beat by hand with a whisk, though it will take longer to achieve a stiff, uniform filling. Make sure the butter is very soft to make hand-mixing feasible.
Q: How do I prevent the orange dot from bleeding into the white filling?
A: Use gel food coloring (concentrated) and keep the orange dollop small and centered. If the white filling is too soft, chill briefly to firm it before adding the colored dot; this minimizes spreading.

Final Thoughts on Chocolate Creme Eggs
These Chocolate Creme Eggs combine accessible ingredients with simple techniques to deliver a luxe, nostalgic treat. Try them once and you’ll see why homemade candy is so rewarding — leave a star rating in the recipe card below or pin this for later.
Conclusion: Chocolate Creme Eggs
For inspiration and comparison, check the store-bought classic on the manufacturer’s product page at Cadbury Chocolate Creme Egg product page.
If you want a dairy-free approach, this vegan version is a helpful reference: Vegan Creme Eggs recipe.
Looking to buy ready-made for party backups, find a multi-pack option here: Cadbury Chocolate Creme Egg at Walmart.
Additional internal reading while you make these: try a contrasting mint option with chocolate-covered mint Oreos. For more chewy textures, see the chewy chocolate chip rice crispy treats tutorial. Use these eggs as part of an Easter spread including Peep-stuffed Easter cookies. If you want a rich cupcake pairing, these go great with chocolate carrot patch cupcakes. Craving cheesecake with chocolate? Try the cheesecake chocolate chip cookie for dessert fusion.
Chocolate Creme Eggs
Ingredients
Method
- Line 48 mini muffin cups with small parchment paper liners.
- Melt 16 ounces of milk chocolate in the microwave until glossy.
- Pipe a thin layer of melted chocolate into each lined mini cup.
- In a stand mixer, beat softened butter and corn syrup until creamy.
- Add milk, vanilla, and salt, then slowly incorporate powdered sugar until it holds stiff peaks.
- Spoon two-thirds of the filling into a piping bag for the white center.
- Color the remaining filling with orange and yellow gel food coloring.
- Pipe a dome of white filling into each chocolate-lined cup, then add a dot of orange filling.
- Melt the remaining chocolate and seal the cups by piping it over the filled centers.
- Refrigerate the pan for 30 minutes until firm.
- Remove parchment liners and store in an airtight container.